
How to Hang Canvas Art — The Complete Guide for Indian Homes
Hang canvas art by locating a stud or solid anchor point at eye level (57–60 inches / 145–152 cm from the floor to the centre of the piece), marking the spot, then driving a D-ring hook or picture-wire nail at the right height. For renters or drywall, adhesive strips and monkey hooks work beautifully without leaving holes.
That's the short answer. But hanging a canvas properly — especially a large or framed one — involves more than luck with a hammer. The difference between art that looks gallery-quality and art that looks "stuck to a wall" comes down to three things: the right hardware, the right height, and the right alignment. This guide walks you through every scenario you're likely to face in an Indian home, from hanging a single statement piece in a living room to arranging a set of three in a bedroom, plus every no-nail option you can use in a rental.
What You Need Before You Start
Before the first tap of the hammer, lay out your toolkit. A proper hanging kit makes the difference between a canvas that sits tight against the wall and one that pulls forward or tilts over time. Most quality brands ship a D-ring hanging kit with every canvas — at Rustic Charm, every piece arrives with D-rings, screws, and wire included, pre-attached so you can hang straight out of the box.
The essentials:
- Measuring tape (flexible cloth or retractable metal)
- Pencil (for light, erasable wall marks)
- Spirit level (a small torpedo level works; your phone's level app is a useful backup)
- Hammer or cordless drill (drill for concrete walls, hammer for plaster/drywall)
- Appropriate wall anchors — plastic rawl plugs for concrete, self-drilling anchors for drywall, picture hooks for plaster
- Hanging hardware already on the canvas — usually D-rings + braided picture wire, or sawtooth hanger for smaller pieces
According to a 2024 home improvement survey by Houzz India, 63% of homeowners in metropolitan cities hang wall art incorrectly on the first try — most often too high, then a second set of holes lower down. Measuring once, marking twice, and drilling once is the discipline that separates a clean wall from a Swiss cheese of mistakes.
Step 1: Pick the Right Height (The 57-Inch Rule)
The single most repeated rule in professional art hanging: the centre of the artwork should sit at 57 inches (about 145 cm) from the floor. This is roughly the average human eye level, and it's the standard used by museums and galleries worldwide. The goal is for a person of average height to view the piece comfortably without tilting their neck.
There are two important exceptions. When you're hanging art above furniture (a sofa, console, bed, or dining sideboard), the bottom of the frame should sit 6–10 inches (15–25 cm) above the top of the furniture. This creates a visual connection between the piece and the anchor furniture below it — essential for living-room and bedroom compositions. When you're hanging in a hallway or stairwell, lower the centre to roughly 50 inches (127 cm), because viewers are usually standing closer and looking more directly at the piece.
The second exception: ceiling height. In homes with low ceilings (under 9 feet / 2.7 metres — common in older Indian apartments), drop the centre by 2–3 inches to keep the scale feeling right. In homes with taller ceilings (modern villas, penthouses), you can lift the centre by 2–4 inches to match the room's proportions. Research from the American Society of Interior Designers shows that art hung at proper eye level receives 40% more visual engagement than art hung above or below standard height — a useful reminder that height isn't a personal preference, it's a design rule.
Step 2: Measure the Wire Drop (The Critical Step Most People Skip)
Here's where most first-time hangers go wrong. You don't nail the hook where you want the top of the canvas to be. You nail it where the wire will rest when weight pulls it down. Skipping this step is why so many canvases end up an inch or two lower than planned.
The simple calculation:
- Measure the height of the canvas (e.g., 24 inches / 61 cm).
- Divide by 2 to find the vertical centre (12 inches / 30 cm).
- Add 57 (or whatever eye-level height you're using for that room) — this gives you the height where the centre of the canvas will sit (e.g., 57 + 12 = 69 inches from floor).
- Pull the picture wire taut upward from the D-rings (mimic the way it will hang) and measure the distance from the taut wire to the top of the canvas. This is your "wire drop" — usually 1–3 inches (2.5–7.5 cm) depending on wire slack.
- Subtract the wire drop from the top-of-canvas height. That's where you drive your nail or screw.
For a 24-inch-tall canvas with a 2-inch wire drop, the final nail position sits at 69 − 2 = 67 inches from the floor. Mark it, level it, and you're ready to drill.
Step 3: Choose the Right Wall Anchor for Indian Homes
Indian homes rarely use drywall the way American homes do. Most urban apartments have brick or concrete walls with plaster finish — which demands different hardware than what's shown in most YouTube tutorials. Using the wrong anchor is the fastest way to either damage your wall or have the canvas fall within days.
Concrete walls (most apartments built after 2000): You need a masonry drill bit and plastic rawl plugs (sizes 6mm or 8mm depending on screw gauge). Drill a pilot hole, tap the rawl plug in flush, then drive the screw. This holds securely for canvases up to 20 kg. A standard giclée canvas print on 300 GSM cotton canvas — even a large 24"×36" piece — typically weighs 1.5–3 kg, so a single 6mm rawl plug handles it with enormous safety margin.
Brick walls (older buildings and independent homes): Brick is more forgiving. Hammer-in picture hooks (sold as "nail + hook" sets at any hardware store) work well for pieces up to 5 kg. For heavier canvases, use the rawl plug method.
Plaster over lath (heritage/colonial apartments): These are brittle. Pre-drill a small pilot hole before hammering to prevent cracking. Use flat picture hooks that distribute weight across a larger surface area.
Drywall/gypsum walls (modern studio apartments, office conversions): Self-drilling plastic anchors or butterfly (toggle) anchors are essential. Never hang heavy art from a plain nail in drywall — it will tear out within weeks. For pieces under 2 kg, adhesive strips (Command strips or 3M equivalents) skip the drilling entirely.
Step 4: Level, Hang, Adjust
Once the hook is in, lift the canvas and slip the picture wire over the hook. Step back three paces. Check the level. Nudge the canvas left or right using small side-to-side shifts (not vertical lifts — vertical adjustments shift the wire under the hook and change the height). For canvases with two D-rings and a taut wire, you can use a trick: slide the wire slightly left or right along the hook to micro-level without moving anything else.
A level canvas is not optional. Research from the University of Toronto's design psychology lab found that a painting hanging just 2 degrees off level is perceived as "wrong" by 89% of viewers, even if they can't consciously explain why. Walk away, come back in an hour, and re-check — walls are never perfectly plumb, and your eye will catch drift that didn't show up on the initial hang.
Hanging Without Nails — For Renters and Rental-Friendly Homes
If you're in a rented flat (or simply prefer not to drill), you have excellent options that don't leave holes or cost your security deposit. These methods handle most single canvas prints up to 2–3 kg — the weight of any standard Rustic Charm small (12"×18") or medium (16"×24") piece.
Adhesive strips (Command, 3M, Scotch): Rated for weights up to 2.2 kg per pair for large strips. Clean the wall with isopropyl alcohol first, stick one half to the canvas frame and one half to the wall, press firmly for 30 seconds, wait one hour before hanging, then snap together. Removes cleanly by pulling the tab straight down.
Monkey hooks and removable picture hangers: Monkey hooks push through drywall by hand, no tools needed, and hold up to 15 kg. They leave only a 3mm pinhole that's nearly invisible and fills with a dab of putty in seconds — perfect for renters who want "nothing permanent" without sacrificing hold.
Picture rail systems: Old Indian heritage homes often have picture rails (a wooden moulding about 2 metres up). These are designed for hanging art from hooks with cords or chains, so use them. Modern apartments can retrofit a picture rail by screwing a simple wooden strip near the ceiling and hanging art from it — no holes in the main wall, and you can rearrange endlessly.
Velcro industrial strips: For canvases that need to sit flush against the wall without any gap (useful for dining rooms and narrow hallways), heavy-duty Velcro strips create a strong, repositionable hold. Stick one side to the canvas stretcher edges, the other to the wall, press together. Holds up to 4 kg per pair.
A 2023 survey of Bangalore renters by NoBroker found that 71% of tenants want to personalise their homes with wall art but avoid doing so because of drilling restrictions in rental agreements. Every method above solves that — none of them violate a typical rental clause, and all leave walls in original condition on move-out.
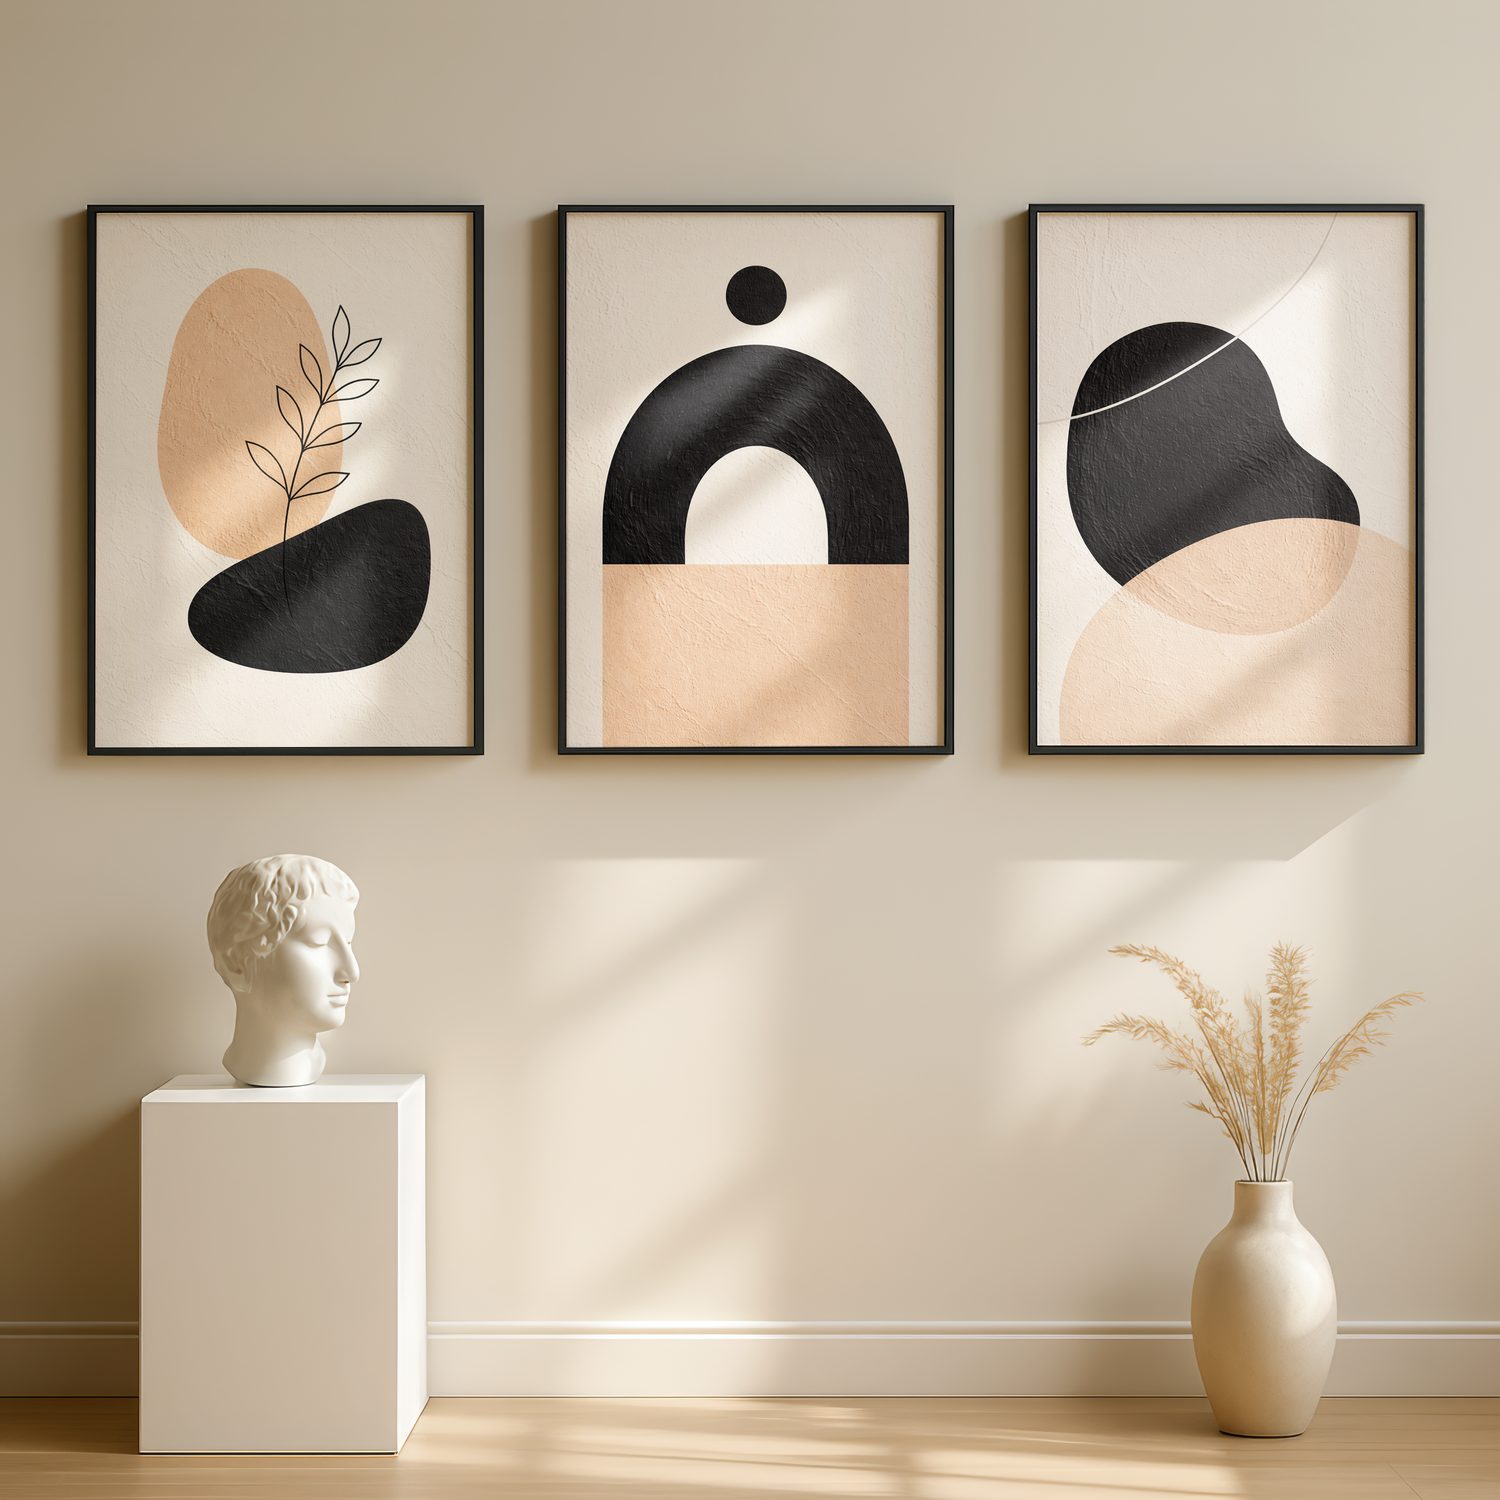
Hanging a Canvas Set — Arrangements That Work
Sets of two, three, or more pieces need more planning than a single canvas. Our Canvas Wall Art Set of 3 collection ships as a coordinated group, but the hanging strategy determines whether the final look is polished or scattered.
The 2-inch gap rule for sets: Leave exactly 2 inches (5 cm) between each piece in a set. Closer than that feels cramped; wider than 4 inches and the set reads as separate pieces rather than a unified composition. Use a ruler or painter's tape as a spacer on the wall before you commit to hook positions.
Horizontal triptych arrangement (most common for living rooms): Centre all three pieces on the same horizontal axis. Measure the total width of all three canvases plus the two 2-inch gaps, divide by 2, measure that distance left and right from your centre point, and you've found the outer edges of the set. Mark centres of each canvas, then mark the hook positions based on wire drop for each individual piece.
Grid arrangement (2×2, 3×3): Use the same 2-inch rule for vertical and horizontal gaps. The secret: use painter's tape to mark the outer rectangle of the full grid first, then divide that rectangle into equal cells. This keeps the entire grid visually aligned even if individual canvases have tiny size variations.
Gallery wall (mixed sizes, irregular layout): For a gallery-style arrangement, cut paper templates (newspaper works) matching each canvas size. Tape them to the wall, step back, rearrange. Mark hook positions through the paper, then pull the paper down and hang the real pieces. This saves 10–20 unnecessary nail holes.
Common Mistakes to Avoid
Hanging too high. The most common mistake in Indian homes, especially over sofas. If the bottom of your frame is more than 10 inches above the sofa back, it floats — and the sofa and art read as two separate objects.
Skipping the stud/anchor check. For any canvas heavier than 2 kg, simply driving a nail into plaster without an anchor is asking for the piece to fall within a month. Always use a rawl plug, a toggle anchor, or find a stud.
Using too few hanging points. A 24"×36" canvas should never hang on a single centre hook. Two D-rings with wire, or two separate hooks spaced under the D-rings, distributes weight evenly and keeps the canvas sitting flat against the wall.
Hanging art in direct sunlight. Even museum-grade giclée prints with UV-protective coating will fade faster in direct midday sun. Hang art on walls that receive indirect light or north-facing walls wherever possible. The 100-year colour guarantee on Rustic Charm canvases assumes normal indoor conditions — not 6 hours of harsh summer sunlight daily.
Ignoring wall humidity. Bathrooms and unventilated kitchens are the worst places for canvas art. Humidity above 65% causes canvas fibres to expand and contract, leading to looseness over time. Keep canvas art in living areas, bedrooms, and well-ventilated kitchens only.
Canvas vs Framed Prints — Does Hanging Differ?
Yes, and understanding the difference helps you choose the right hardware. Canvas prints (gallery wrap, floating frame, or box frame) are lighter and sit closer to the wall, usually with D-rings 1/3 down from the top. Framed paper prints under acrylic glass are heavier by weight-per-square-inch and often use a single top hook combined with two bottom bumpers to keep the frame from tilting. For a full breakdown of which format suits which wall, see our guide on Canvas Prints vs Framed Prints — Which Is Right for Your Home?.
If you're still deciding what size to order before worrying about hanging, our complete wall art size guide walks through how to match canvas dimensions to wall width, furniture proportions, and room scale. And for bedroom-specific hanging inspiration, see our minimalist bedroom wall art ideas. Living room hang heights and style pairings are covered in detail in our living room wall art guide.
Room-by-Room Hanging Heights
Living room (above sofa): Bottom of canvas 6–10 inches above sofa back. Centre roughly at 60–65 inches from floor.
Bedroom (above headboard): Bottom of canvas 4–8 inches above headboard. For a minimalist, calming effect, see our Minimalist Wall Art collection — simple line art paired with a low-slung headboard creates a balanced sleep space.
Dining room (above sideboard or on empty wall): Centre at 57 inches from floor. Art in dining rooms is viewed from a seated position, so pieces hung slightly lower (55 inches) can actually look better.
Office/study: Centre at 60 inches — you'll stand up more often than you sit in front of wall art, so lean towards standing eye level.
Hallway: Lower to 50 inches from floor. Hallways are transit spaces; viewers catch the piece in passing rather than in prolonged viewing.
Kitchen: Keep canvas away from direct cooking steam. Hang 60 inches from floor, on walls opposite the cooktop if possible. Our Kitchen Wall Art collection is designed for these conditions.
Frequently Asked Questions
Q: How do I hang a canvas without making holes in the wall? A: Use adhesive strips (Command or 3M brand) for canvases up to 2 kg, monkey hooks for heavier pieces (leaves only a 3mm pinhole), industrial Velcro strips for repositionable hanging, or a picture rail system for rental-friendly flexibility. Clean the wall with isopropyl alcohol first, press firmly for 30 seconds when applying strips, and wait one hour before hanging any weight. All of these methods leave walls essentially undamaged on removal.
Q: What height should a canvas be hung? A: The standard gallery rule is 57 inches (145 cm) from the floor to the centre of the canvas — roughly eye level for average height. When hanging above furniture (sofa, bed, sideboard), keep the bottom of the frame 6–10 inches above the furniture top. Lower to 50 inches for hallways and above 57 inches for rooms with very high ceilings.
Q: How do I hang a canvas on a concrete wall in an Indian apartment? A: Use a masonry drill bit with a 6mm or 8mm plastic rawl plug. Drill a pilot hole at your marked position, tap the rawl plug in flush with the wall, then drive a screw or hook into it. This holds securely for canvases up to 20 kg — overkill for most giclée canvas prints, which typically weigh 1.5–3 kg. A cordless drill with hammer function makes this quick; a corded masonry drill works too.
Q: How do I keep a canvas level after hanging? A: Hang the canvas using two D-rings with a taut picture wire (or two separate hooks placed directly under each D-ring) rather than a single centre hook. This distributes weight evenly and prevents the canvas from tilting. Check with a spirit level immediately after hanging and again an hour later. Small adhesive bumpers on the bottom back corners keep the canvas pressed flat against the wall and prevent drift.
Q: Can I hang a canvas in direct sunlight? A: Avoid it. Even UV-protected giclée prints fade more quickly under daily direct sunlight. Choose walls that receive indirect or north-facing light. If the best wall in your room faces south or west, use sheer curtains during peak sunlight hours. Rustic Charm's 100-year colour guarantee assumes indoor display in normal conditions — not continuous harsh sunlight.
Q: How do I hang a set of 3 canvases in alignment? A: Treat the set as one composition. Measure the total width (all three pieces plus two 2-inch gaps), find the centre, then mark the hook position for each individual canvas based on its own wire drop. Keep a consistent 2-inch gap between pieces. Use painter's tape on the wall as a spacer before committing to hook positions. Our Canvas Wall Art Set of 3 collection is designed to hang as a coordinated triptych.
Final Checklist Before You Hang
Before you drill a single hole, run through this list:
- Measured wall width and confirmed canvas size fits (see our size guide)
- Decided on hang height using the 57-inch rule (adjusted for furniture or ceiling height)
- Calculated wire drop from canvas top to taut wire
- Chose the right anchor for your wall type (rawl plug for concrete, anchor for drywall)
- Have a spirit level or level app ready
- For renters: confirmed adhesive strip rating covers canvas weight
- For sets: measured the 2-inch gap rule and marked centres
A carefully hung piece becomes the anchor of a room. Rush it, and you'll live with the frustration every time you walk past. Take the 15 minutes extra to measure, level, and adjust — and the result is a canvas that feels like it was meant for that wall from day one.
Ready to pick a piece? Explore our Abstract Wall Art, Boho Wall Art, Floral Wall Art, and Minimalist Wall Art collections — every canvas ships with a complete D-ring hanging kit, printed on 300 GSM acid-free cotton canvas with museum-grade giclée inks, sealed with two layers of UV-protective satin clear coat. Made-to-order in Bangalore, delivered across India in 6–10 business days.